36 tips to master your iPhone
Make your time with iPhone slicker by integrating these tricks into your routine.

“What is high value, frequent use and easy, yet not trivial?”
I sat down to dissect my iPhone usage, resolved to be ready next time my mom would surprise me once more with “Can you teach me a new trick with the phone? 🤓”.
I then realized that this list might be of broader interest. We spend 2-6 hours daily on our smartphones. Make those sweeter; or at least have you prepared when your parents come up with the same question 😂
So here’s the outcome. 36 tips – a 3-a-month diet for a year.
You’ll enjoy this post better as a reference than a prosaic read. It’s probably best used as follows:
- Go through the Table of Contents to get an overview.
- Pick a few tips that interest you and go read their text.
- Choose 2 tips out of them to ingrain into your routine next.
- Practice them deliberately for a couple of weeks until they are second-nature to you.
- Come back to this article thereafter and repeat the process.
📸 Photos
Quick camera access
When your phone is locked, i.e. most of the time:
- Lift your locked phone to “wake” its display.
- Don’t unlock it! Instead, swipe your finger from the right edge of the screen towards the left.
There, camera open.
If your phone is unlocked, i.e. you’re currently using it:
- Swipe down the Control Center from the top-right corner of the screen.
- Tap the Camera button at the bottom of the Control Center.
There, camera open.
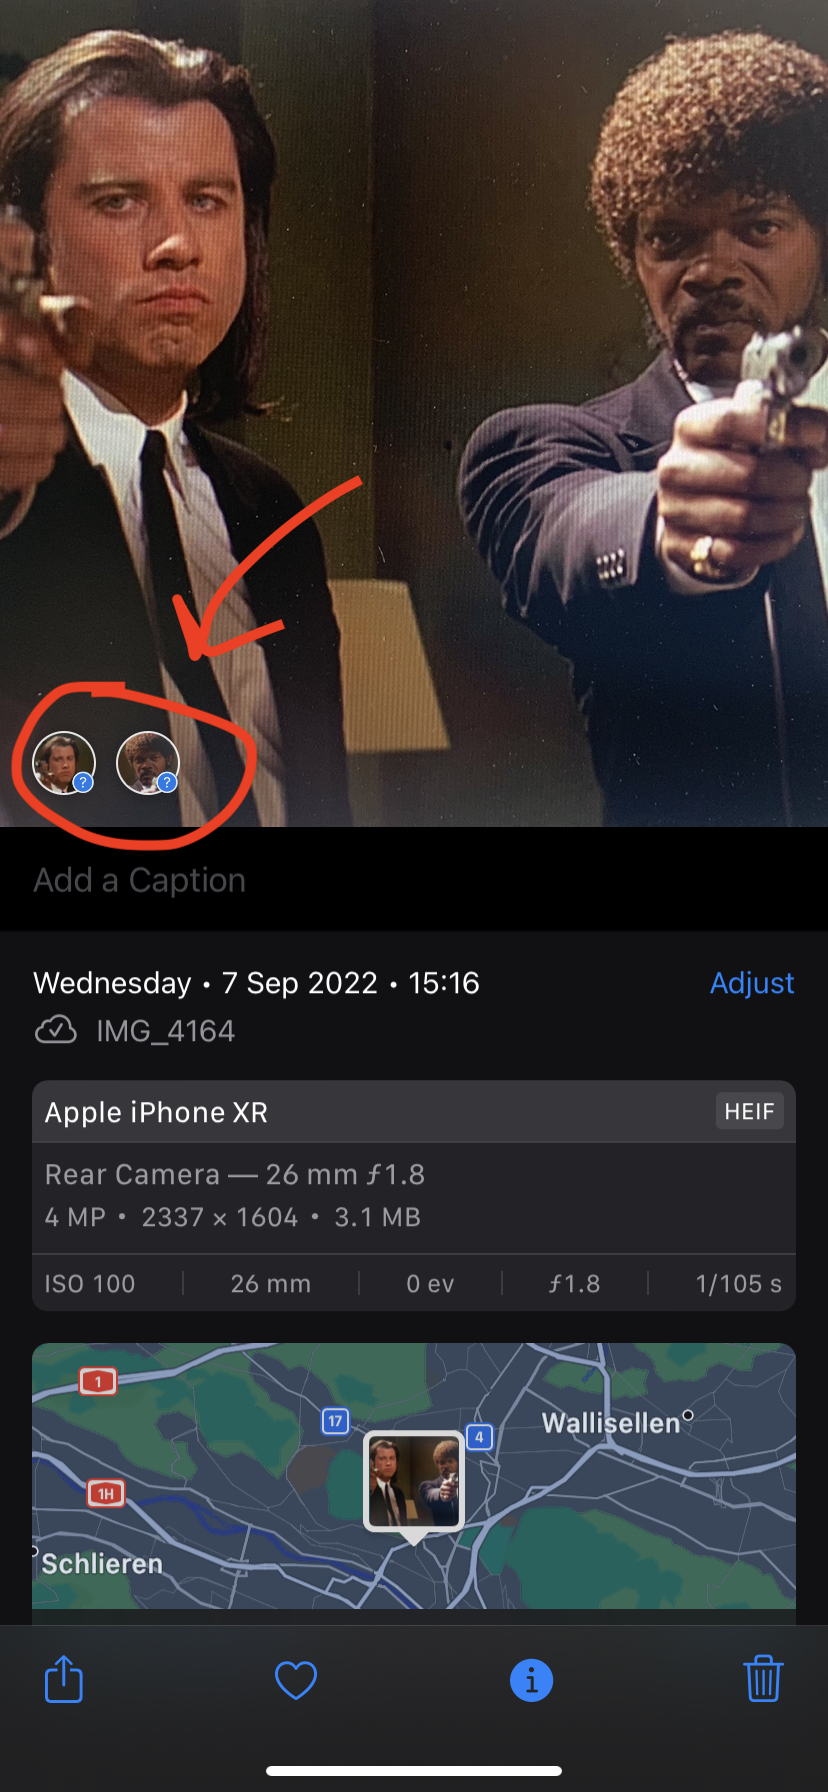
Where and when was a picture taken?
- Open the Photos app (see quick camera access).
- Tap to select a picture.
- The picture opens full screen. Swipe up (one finger) to open the picture details.
In the picture details you see:
- Date and time when the picture was taken.
- Location (map) where the picture was taken.
- File name and format.
- Photographer information (ISO, shutter, focal length, lens, aperture).
Use photos for reminders
You can use the camera to take memos. For example:
- You see a leaflet of a show you’re interested in? Snap a picture!
- You need the time table of your bus stop? Take a picture!
- Someone hands you their visit card? Take a picture, save a tree!
Using photos for memos has 2 main advantages:
- It helps un-clutter your life. No more paper scraps all over the place.
- It keeps that information always reachable and searchable, whenever and wherever you are.
Finding photos by location
Got too many pictures and want to find the one you took at the latest theater visit? No problem!

- Open the Pictures app (see quick app start)
- Tap “Albums” at the bottom.
- Scroll down until you see a map labelled “Places”, then tap to open it.
- Scroll and pinch around the globe to the location where you shot the picture.
- Available pictures for the area will show up as you move.
Finding photos by person
Got too many pictures and want to find one you took with your grandchild? No problem!
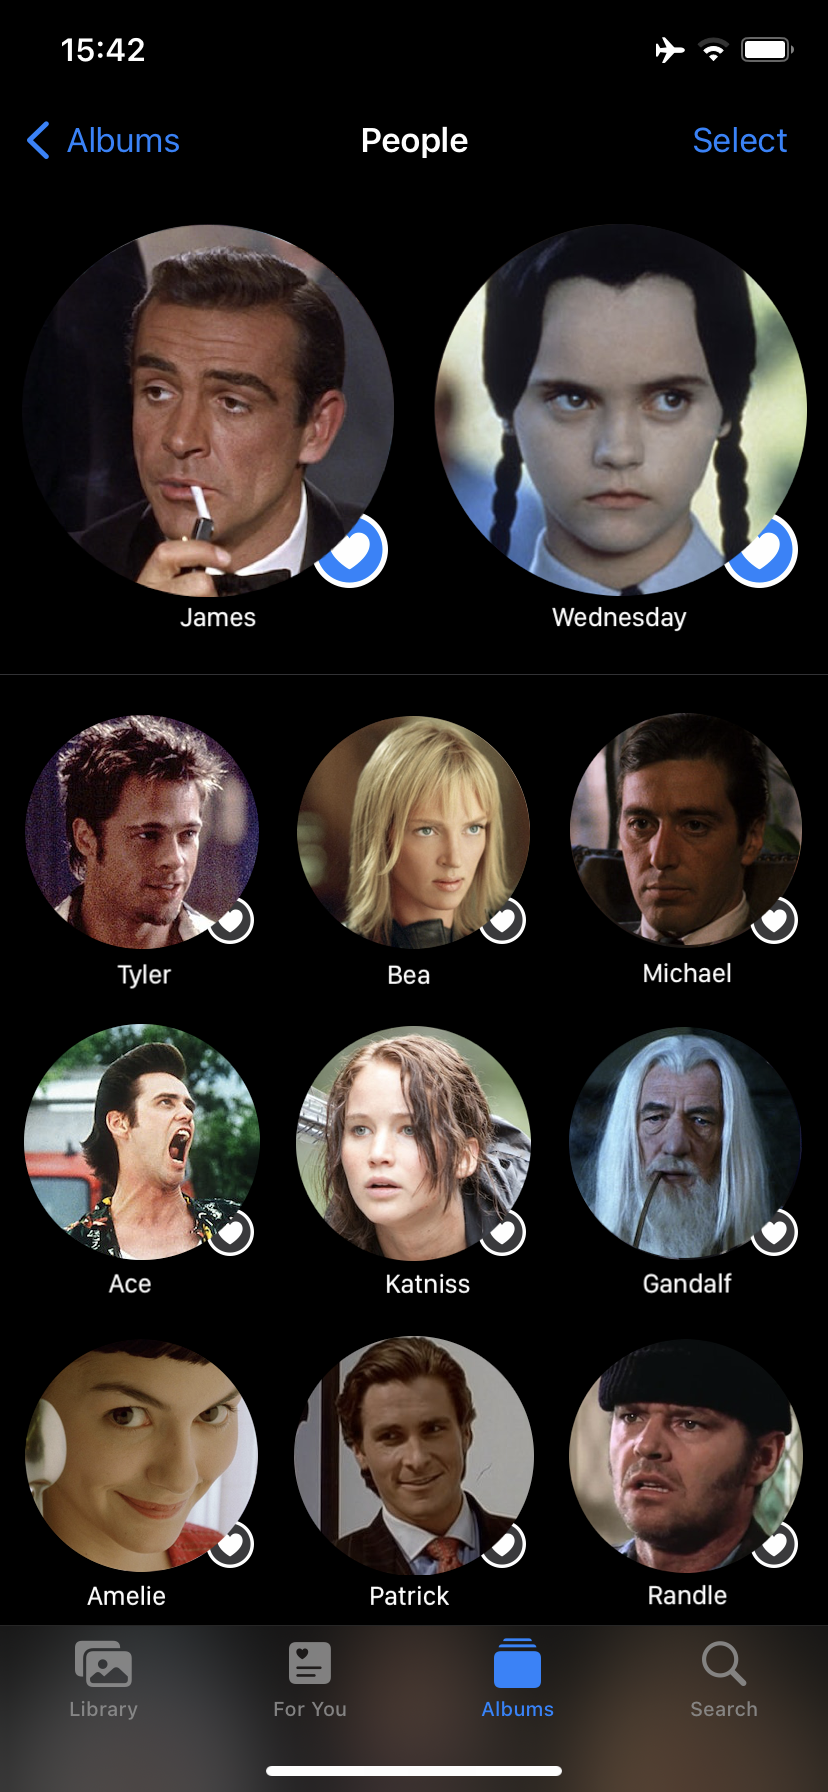
- Open the Pictures app (see quick app start)
- Tap “Search” at the bottom.
- Type the name of the person you want, or tap a close-up of them.
Naming persons in photos
How does the iPhone know who’s who? You tell it!
- Open the Photos app (see quick app start).
- Tap a picture with the face of a friend in it.
- The picture opens full screen. Swipe up (one finger) to open the picture details.
- Look at the bottom of the picture: people’s faces appear.
- Tap on a face and select “Tag with name”.
- Start typing the name, and the iPhone offers you matching names from your contacts.
🔌 Saving battery
Saving battery has two advantages:
- Less stress during the day for not making it to the evening, even with heavy usage.
- Battery lifespan improves: less charges means your battery degrades slower, making your phone itself live longer. A year longer is 200+ CHF saved!
Don’t expect your energy bills to shine for this – your iPhone contributes <1 kWh a month (<0.30 €) to it.
Energy saving mode
Have your battery last 20% longer at no perceivable cost – with Low Power mode.
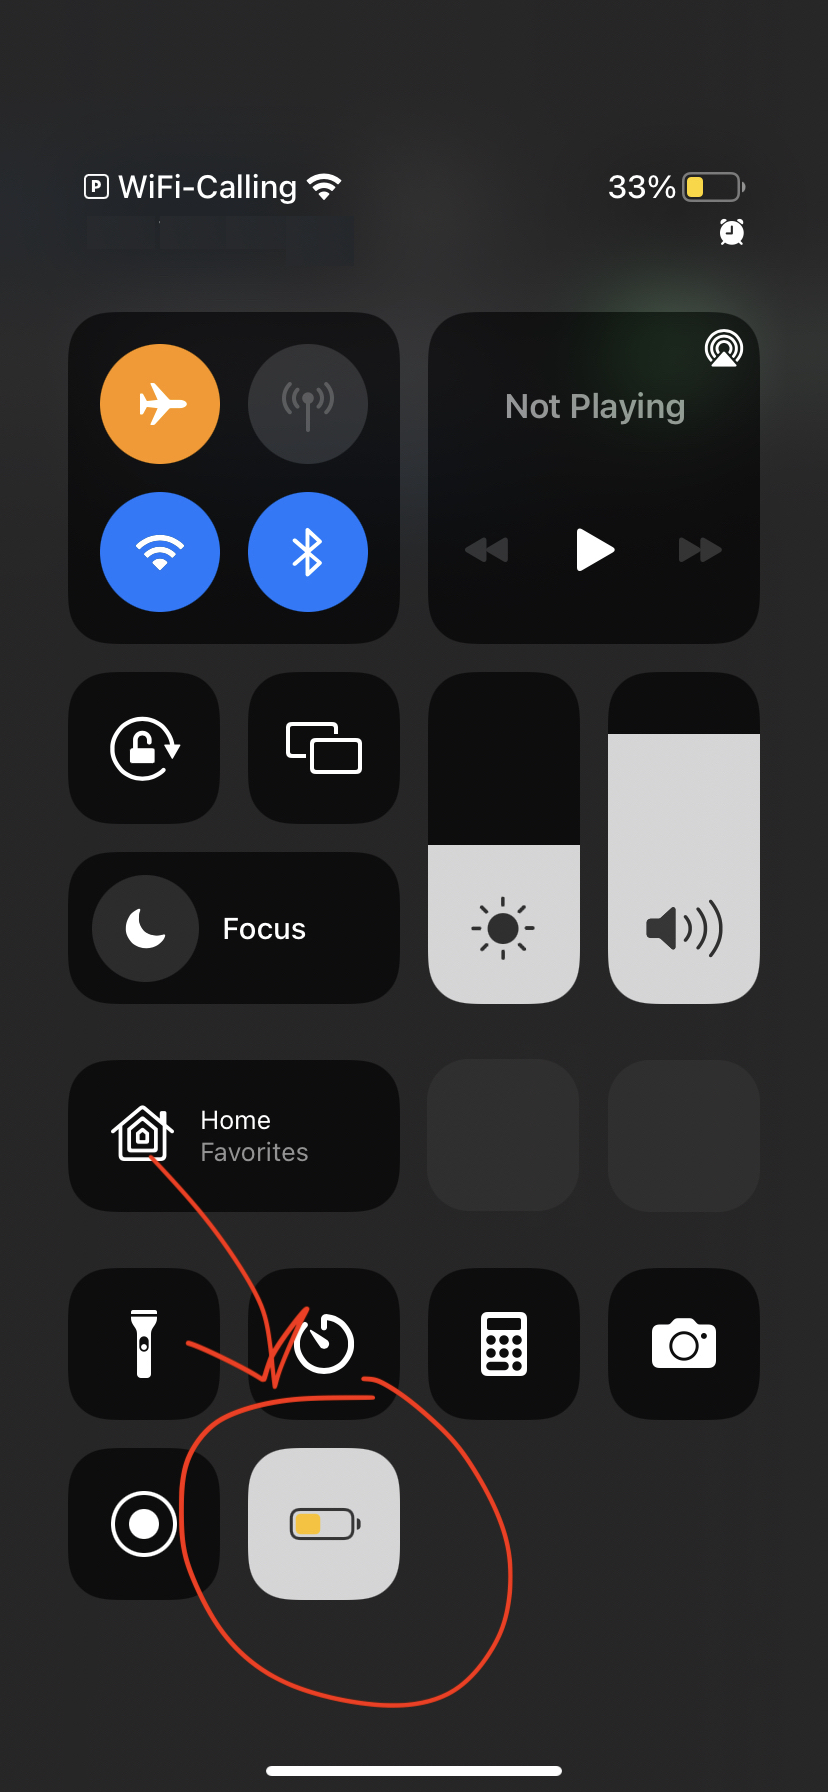
Low Power mode kicks in automatically when your battery drops below 20%, but you can turn it on earlier manually. A permanent enable is currently not supported. Add a button to enable “Low Power Mode” in you Control Center instead:
- Open the “Settings” app (see quick app start).
- Reach menu “Control Center”
- Scroll to find row “Low Power Mode” and turn it on
Done. Then, every morning as you wake up, you probably already reach Control Center to disable Airport mode. In the same step, also tap Low Power and your phone will be on a healthy diet all day.
Wi-Fi calling
Keeping connection to the cellular network crunches 25% of your iPhone’s battery.
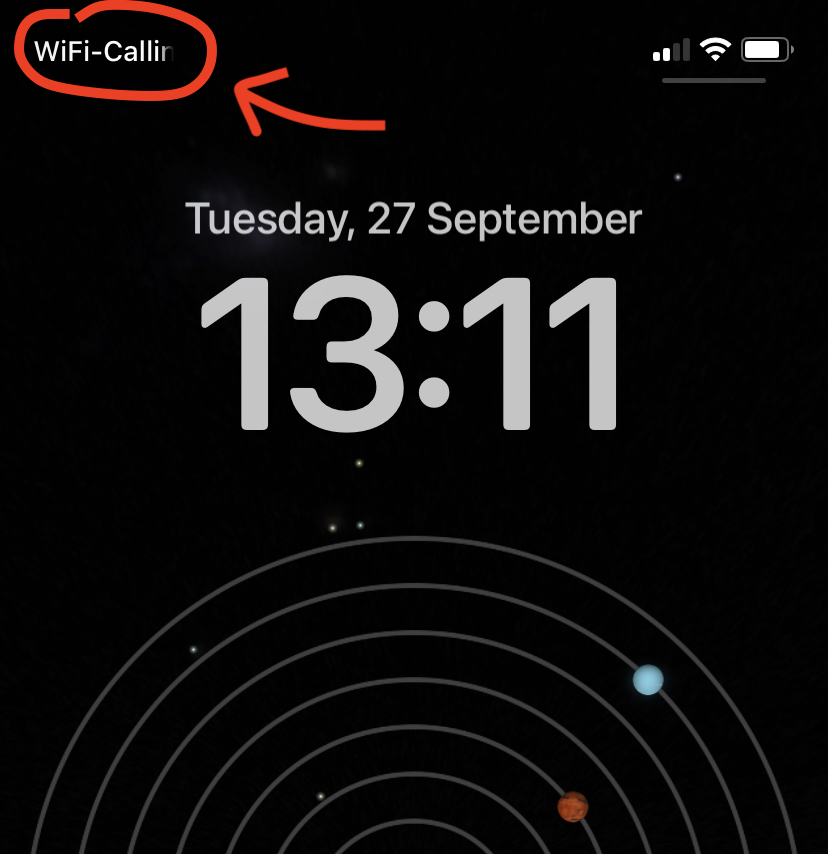
Modern network operators support Wi-Fi calling, which allows you to save that power altogether. With Wi-Fi calling, your iPhone exchanges cellular packets with the network operator through the Internet instead of cellular, so you can both call and text as normal:
- Open the “Settings” app (see quick app start).
- Reach menu Phone → Wi-Fi calling.
- Enable “Wi-Fi calling”.
- From the Control Center, enable Airport Mode (but leave Wi-Fi enabled!).
After a minute you’ll see “Wi-Fi calling” in the network slot of your lock screen. You don’t? You’re not connected to Wi-Fi, or your operator doesn’t support Wi-Fi calling.
In the latter case, do send them a request for it! If nobody complains, they’ll rightfully never implement it. If some do, they ultimately will. Help modernize your country!
🔬 Scanning stuff
QR Codes
Use QR Codes to massively speed up some tasks. For example:
- Connect to a Wi-Fi network without typing name and password.
- Reach a website without typing the URL.
- Locate an App to install, without typing a search into the store.
- Add an addressbook contact without typing name or number.
and more!
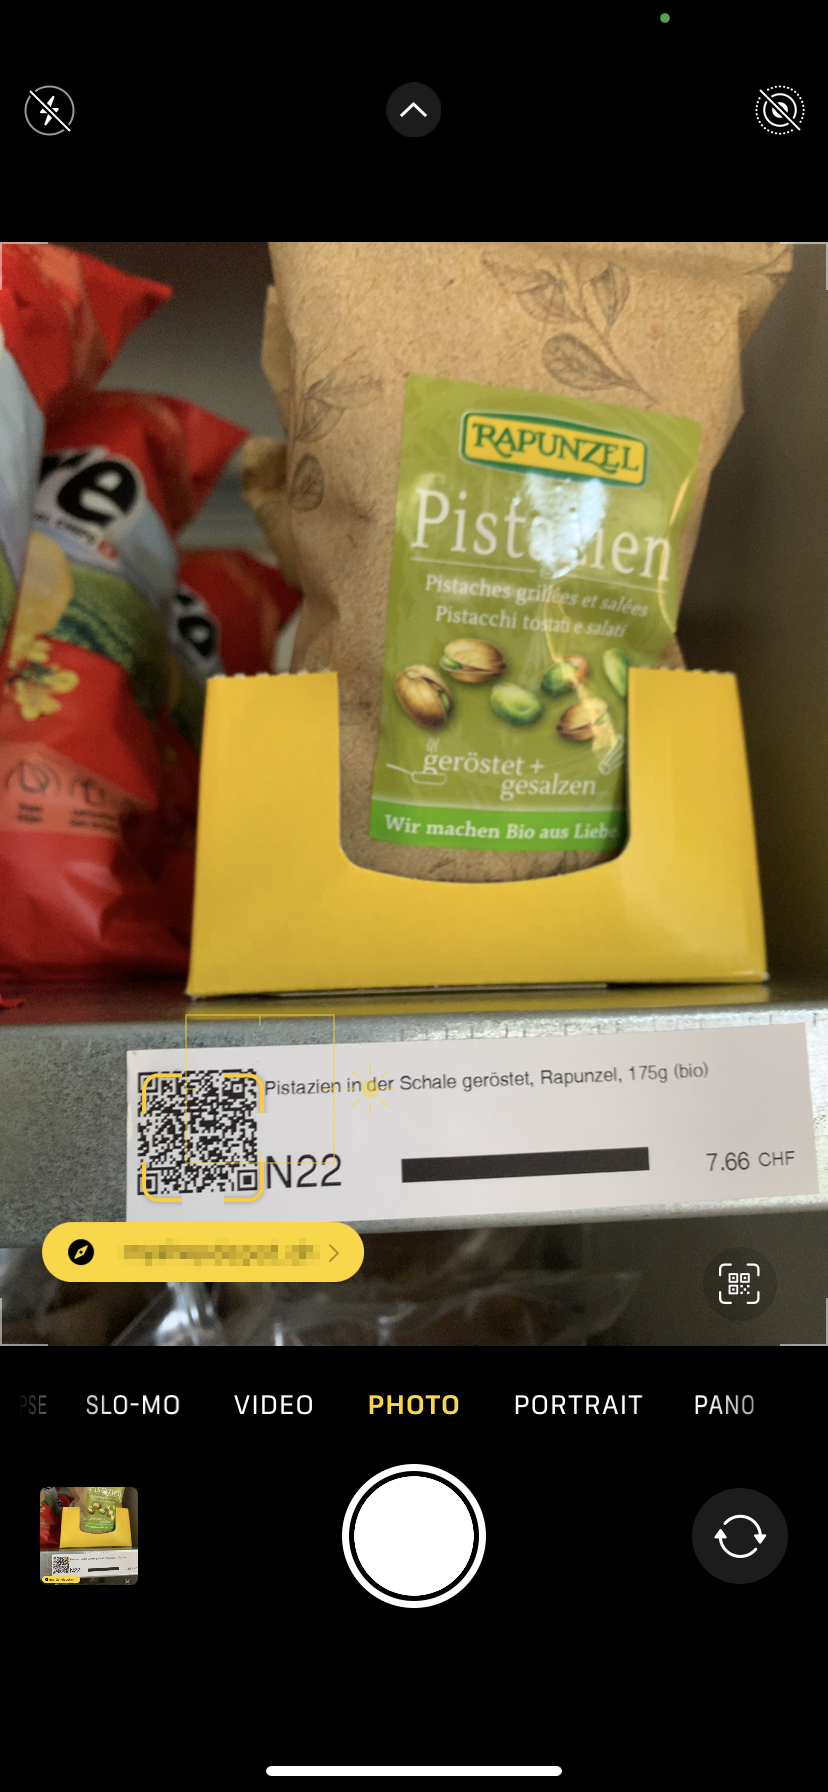
QR Codes are easy to scan with your iPhone:
- Open your phone’s camera (see quick camera access).
- Point your camera to have the QR code in frame, and wait a moment.
- A popup will show around the QR; the phone recognized it and offers you to use it.
- Touch that popup to take that action (e.g. visit website, connect to network etc).
Nota bene: Frame the QR code close enough that you can distinguish its pixels.
https://apprenticecitizen.com. Or another safe Wi-Fi QR generator to let your friends easily connect with your home Wi-Fi.Text in pictures
Recent iPhones can read text from the camera. You can, for example:
- Copy phone numbers from billboards.
- Send a colleague a block of text from a document.
- Translate an article from a magazine in a foreign language.
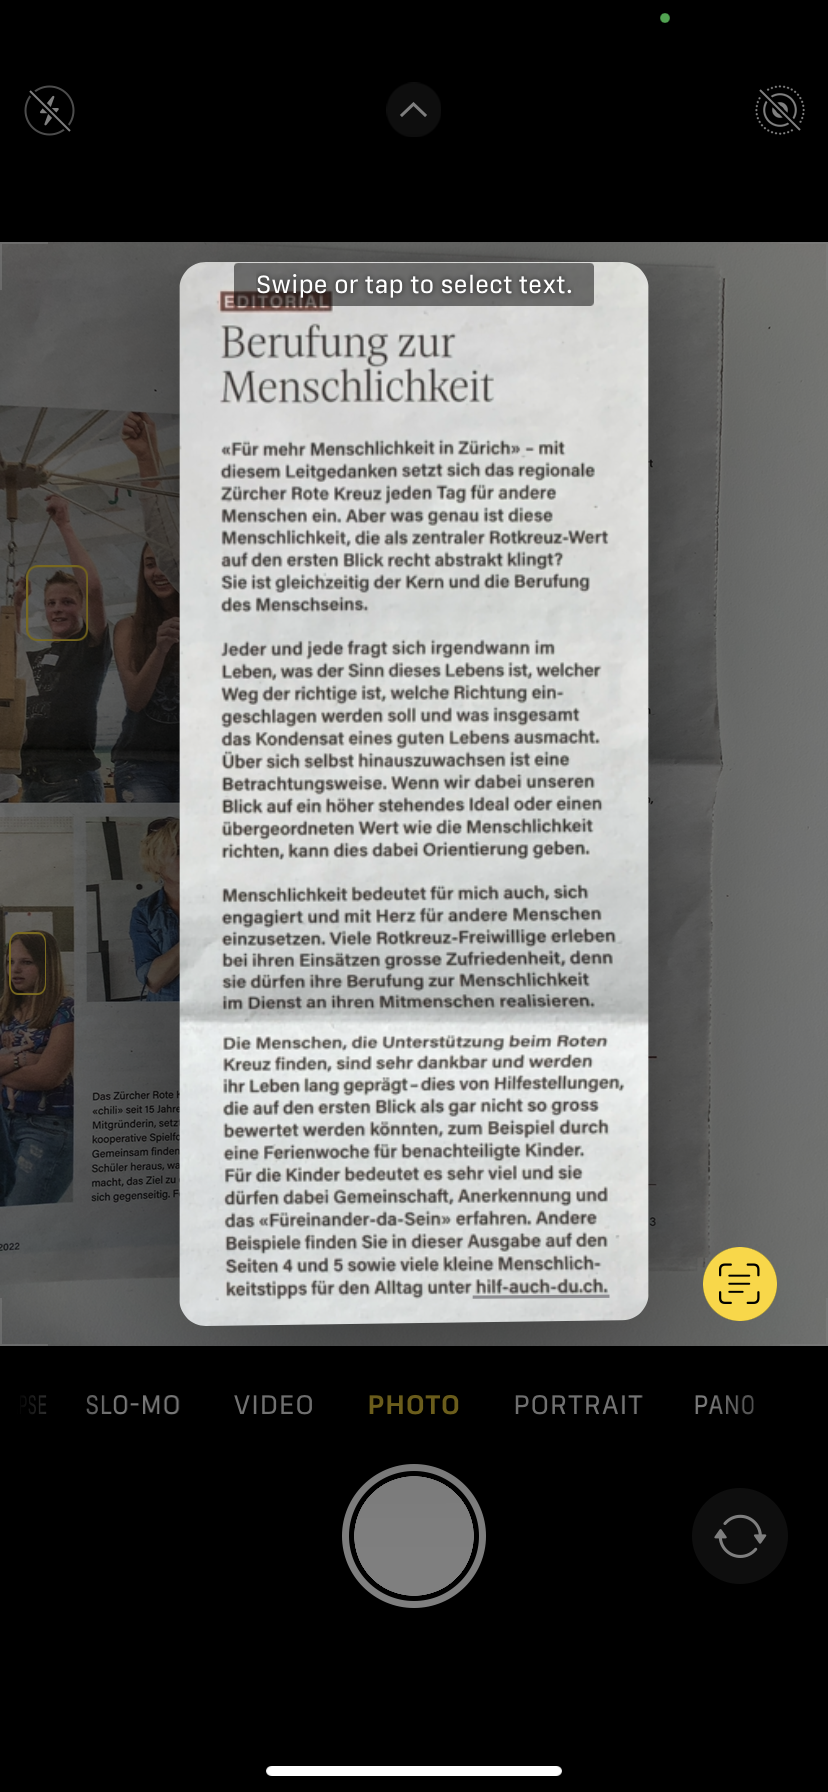
Here’s how you do this:
- Open the Camera (see quick camera access).
- Point the camera onto any text and keep the frame steady.
- Touch the text you want to act on, in the frame.
- Tap the little “text” icon which appears on the bottom-right of the camera frame.
- The iPhone will highlight the text; you can now long-touch to select parts of it to copy, share, translate, lookup etc.
You can do the same from already-taken pictures:
- Open the “Photos” app (see quick app start) and select your desired picture.
- Tap the little “text” icon which appears on the bottom-right of the camera frame.
- The iPhone will highlight the text; you can now long-touch to select parts of it to copy, share, translate, lookup etc.
Measuring
You can measure lengths and levels with your iPhone!

- Open the “Measurement” app (see quick app start).
- Tap “Measure” to select measurement mode.
- Slowly move the camera around your space, until a little “target” symbol shows up.
- Point the target to where you want to start measuring, then tap the “+” button.
- Move your phone for the target to move until your measurement destination, and you’ll see the length.
Magnifying
This is useful for reading tiny print.
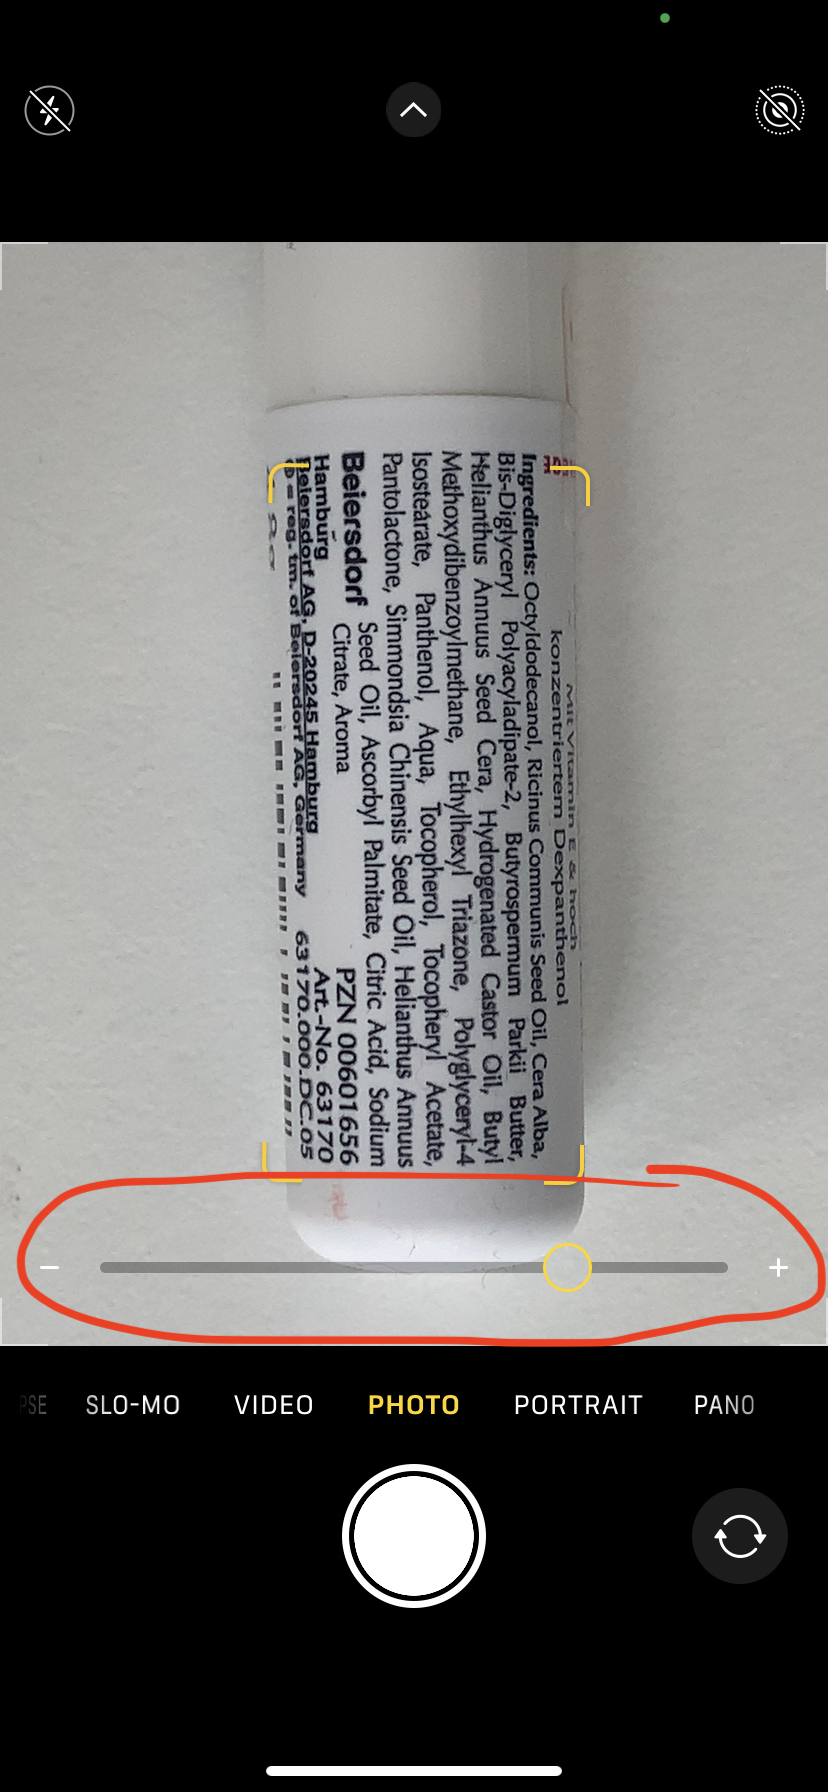
- Open the Camera (see quick camera access).
- Pinch in to zoom, like you would on a picture.
✍️ Typing faster
Correct mistakes with space
Sometimes you need to go back a few characters to correct a typo. Pointing the cursor to the exact spot can be a huge pain 😩
Here’s how you speed it up:
- Long-touch the space bar with your thumb. The cursor flashes big once. Continue keeping it touched!
- You’re now ready for precision pointing. Swipe your thumb left or right until the cursor is positioned exactly where you want it.
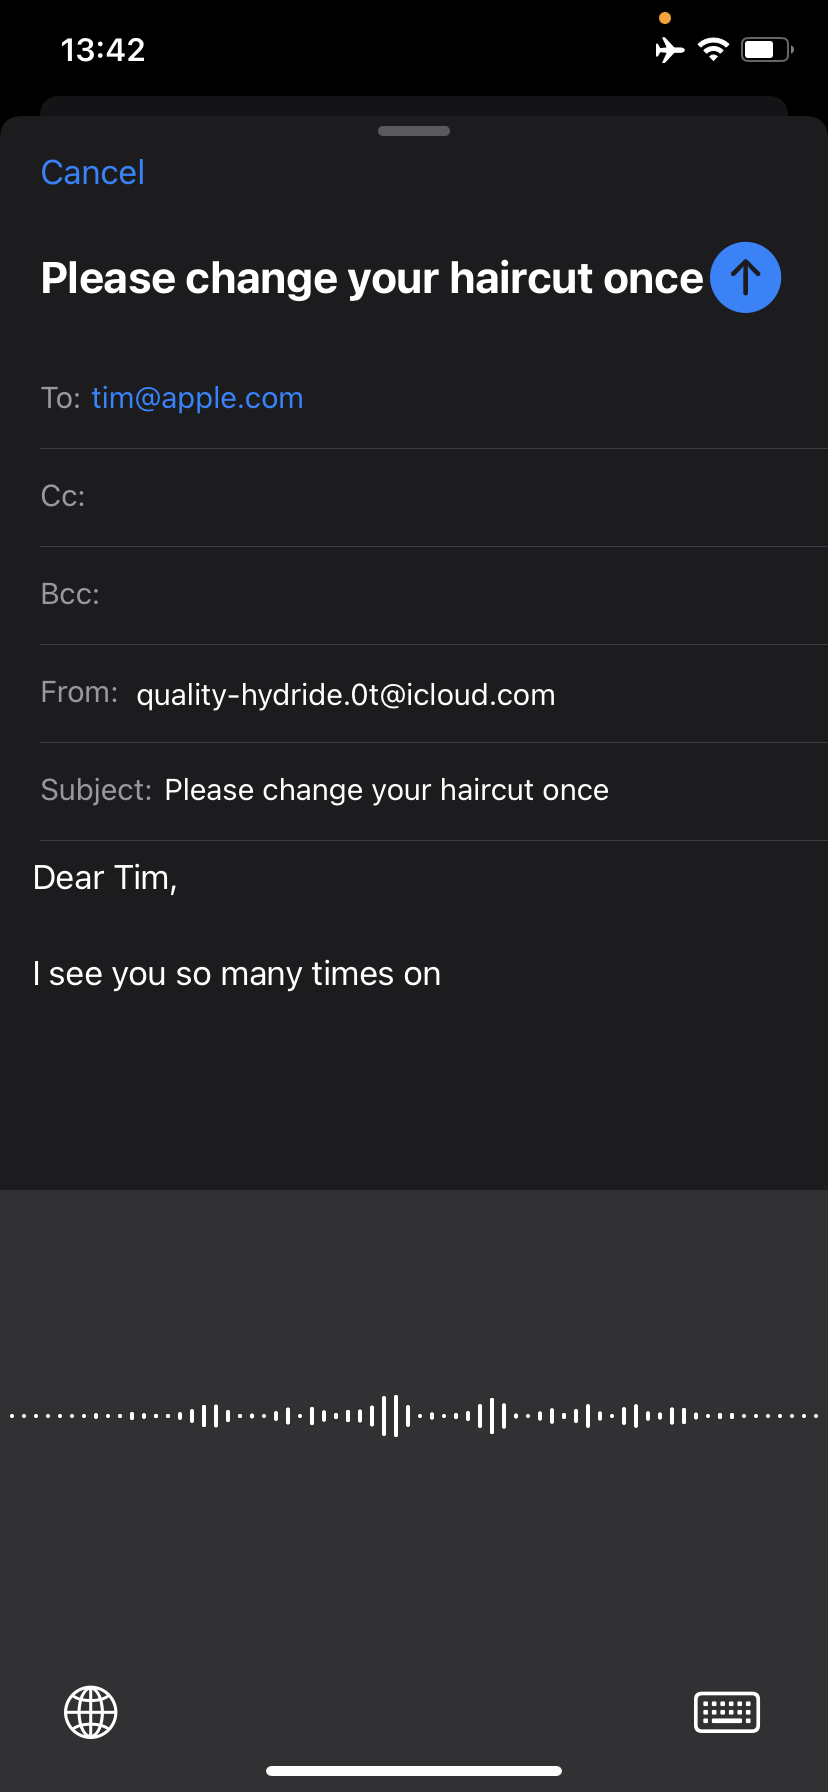
Dictate
Siri is generally terrible, but it works well with some languages – especially those with a clear grammar structure (like everything but English 🤣).
Dictate as follows:
- Tap any text field, so the keyboard shows up.
- Tap the microphone symbol at the bottom of the keyboard.
- Start dictating your text.
Some tips for dictation:
- Talk slow and clear.
- Spell out punctuation, for exaple “period”, “comma” etc.
- Ignore any mistake and proceed dictating; you’ll fix them later.
- Do you use multiple languages? Make sure your keyboard is set on the right language before starting to talk!
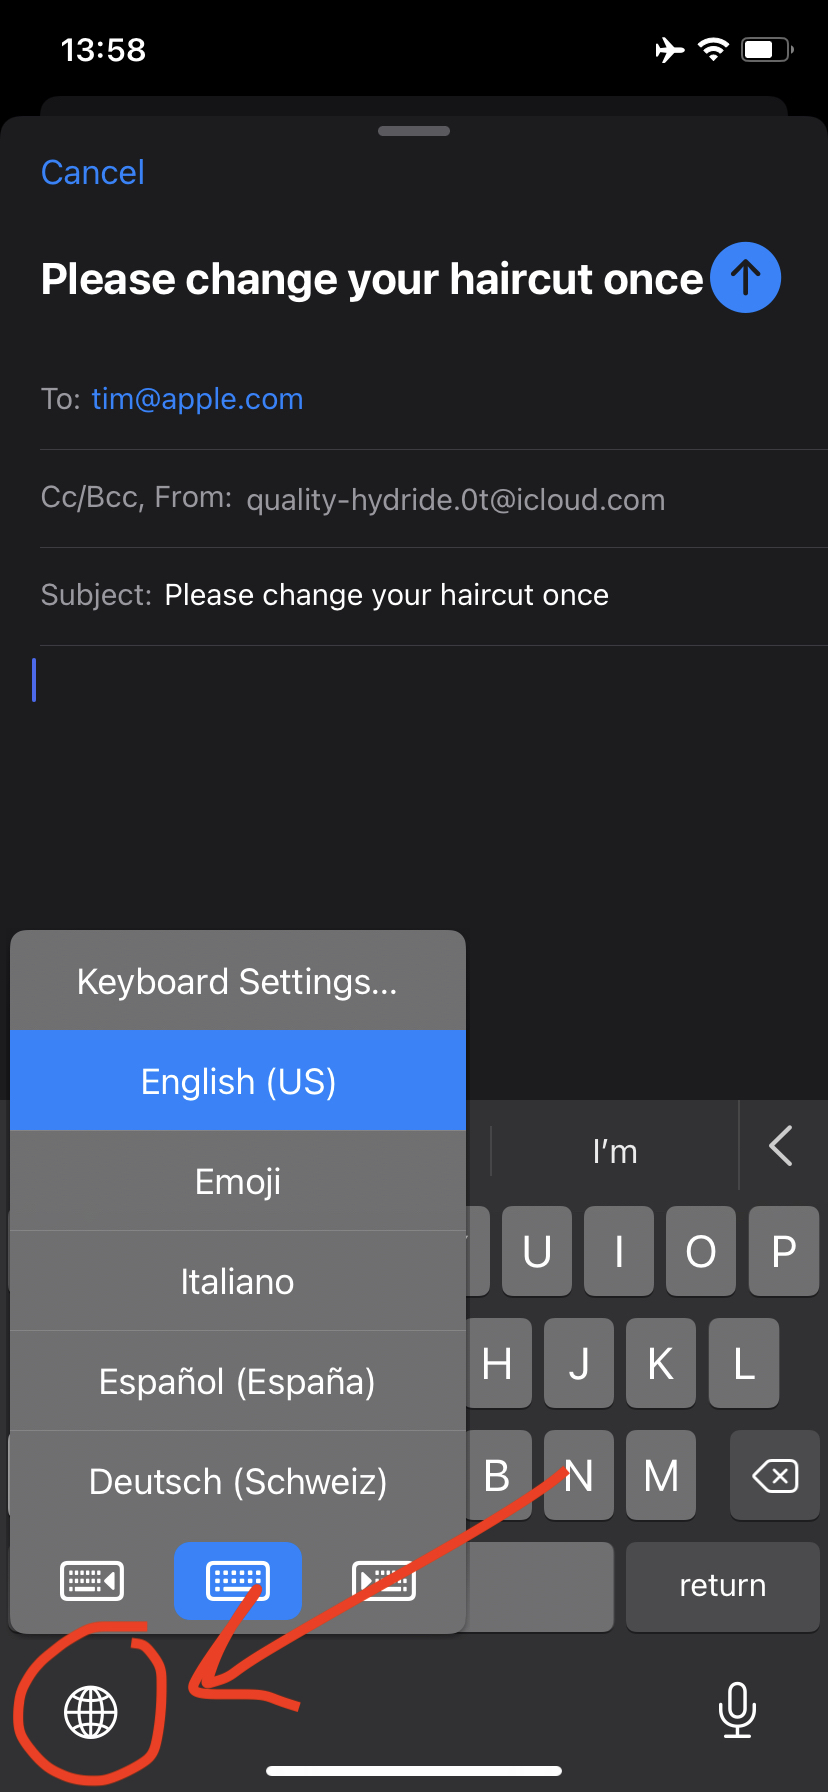
Multiple languages
Do you happen to communicate with people in multiple languages?
This is often the case in international companies, mixed regions (e.g. California, South Tyrol), and multi-lingual countries (e.g. Switzerland 🇨🇭, Canada 🇨🇦, India 🇮🇳).
Don’t type in a language different from what your iPhone keyboard expect!!
- You’ll fight against the iPhone auto-correcting all words.
- You’ll mess up your standard language, as the iPhone tries to learn new words you use.
Tell your iPhone you know multiple languages instead:
- Open the “Settings” app (see quick app start).
- Scroll up to the top, and further to expose Search. Then search for “Keyboards”.
- Tap open the “Keyboards” result, and then tap “Keyboards” within it.
- Tap “Add New Keyboard” and select the language you want to add. Make sure to select the correct region too, e.g. “Spanish” has Spain, Mexico and Latin America.
Done with the setup. Now whenever you use your keyboard, switch to your desired language by tapping the “world” icon 🌐
💳 Paying
Apple Pay
Ever approached your credit card to pay? You can do the same using your iPhone – faster and it allows you to keep your credit card at home for security and convenience.
Payments are executed as they would be with your physical credit card, at no extra cost.
Setup Apple Pay first:
- Get hold of your physical credit card.
- Open the “Wallet” app (see quick app start).
- Press the “+” to add your credit card, then select “Debit or Credit Card”.
- When you’re asked for card details, you can simply point your camera to your physical card – the iPhone will scan the data. This only works with good light conditions.
- Continue the process until conclusion, and your card is setup.
Next time you want to pay:
- Pull your iPhone out of your pocket.
- No need to unlock it: simply double-click the Side Button.
- The iPhone will want to authenticate you. Present your face (FaceID), finger (TouchID) or code.
- Approach the phone to the payment terminal, like it were your credit card.
Done!
🛰️ Connectivity
Bring your laptop online through your iPhone (tethering)
Letting your phone be a bridge to the Internet for computers is called tethering.
On your iPhone:
- Make sure that Airport Mode is disabled, and it’s connected to the cellular data network and disconnected from Wi-Fi.
- Open the “Settings” app (see quick app start).
- Scroll to “Personal hotspot” and tap it open.
- Enable “Allow Others to Join”.
- The iPhone shows you a “Wi-Fi password”.
On your laptop:
- Open the list of Wi-Fi networks.
- Make sure your iPhone is currently displaying the “Personal Hotspot” screen (important!).
- Your laptop will show, in the list of available Wi-Fi networks, your iPhone’s network name – e.g. “Michele’s iPhone”.
- Click that network to connect to it, and copy the password from the iPhone when requested.
Once the laptop has connected to that network, you can browse the Internet.
Browsing abroad (roaming)
You can browse the Internet when abroad.
EU 🇪🇺 residents in particular have the luxury of generous roaming allowances within the EU mandated by the European Union itself:
- Open the “Settings” app (see quick app start).
- Select “Cellular” from the list.
- Tap to enable “Data roaming”.
❇️ Apps
Quick app start
From your home screen:
- Swipe down the screen, starting from the middle (not the top, else you’ll open the Control Panel!).
- A search bar opens. Type the first 1-2 characters of the app name.
- The apps matching that name will show in the results; tap yours to open it.
Organize apps
Grouping apps in categories and moving them around in screens is a thing of the past. The iPhone can do it for you with App Library:
- From the home screen, swipe the screen left through all app screens, until you land to one with a dark background.
- Welcome to the App Library!
The App Library takes a couple of weeks to get used to, but then it’s much faster to use:
- It learns what apps you use most often, and in which contexts and sequence, and highlights those first.
- It bucks them in pre-arranged categories. You may not agree with the naming, but who cares, really? You should be able to find your app quickly most of the times.
- Else you can tap the Search bar on top and tap the first 1-2 characters of the app name (more is not needed!) – your app will show up in the first 4 results.
My setup now fully revolves around the App Library: I removed all old “app screens” and only use quick app start and App Library.
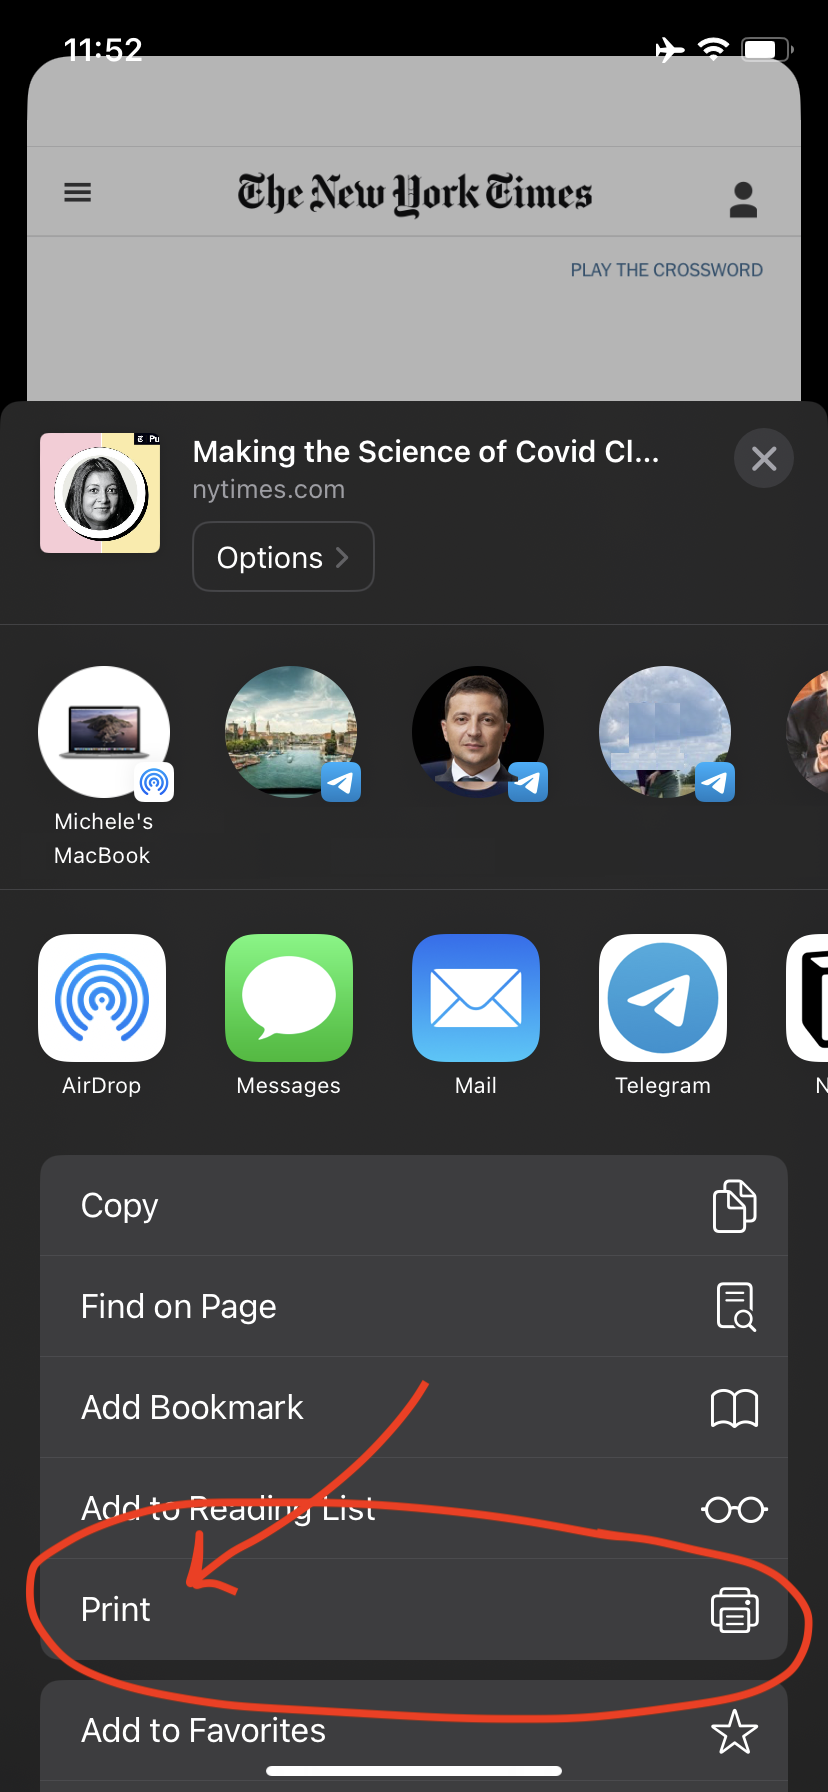
Share paywalled articles with Safari
Want to share a news article with a friend who doesn’t have a subscription for the site? No problem – you can send them a PDF version of it easily:
- Open Safari and go visit the web page you want to share.
- Press the “Share” button.
- Choose “Print”
- You’re presented with a print preview. On the previewed pages, pinch to zoom in as if you wanted to make them full screen.
- A fullscreen PDF view of the page is shown to you. Tap the “share” button on it to send it to whomever.
Pro tip: when sharing news articles, choose “Reader view” in Safari before starting the process above. This will generate a much cleaner PDF with no ads or distracting layout.
🗣 Siri
Terrible in general – as of 2022 🤣 However, useful for the few specific taks listed below.
First, enable Siri as follows:
- Open the “Settings” app (see quick app start).
- Find “Siri & search” and tap it open.
- Enable “Press Side Button for Siri”.
- If you want, enable ‘Listen for “Hey Siri”’. The iPhone will continuously listen and activate when it hears “Hey Siri”. Processing is local, except for sound after detecting “Hey Siri”, which are sent to Apple for hi-fi processing. Some detections may be spurious.
Set timers quickly
I use this on a daily basis, e.g. to:
- Remind myself to fetch laundry 1h after starting the washing machine.
- Set a timer for pasta.
- Call my attention minutes before a call I scheduled to make or receive with someone.
Simply do as follows:
- Activate Siri by either long-pressing the Side Button, or saying “Hey Siri” (if enabled).
- Say “Set an alarm in 48 minutes”. Or simply “48 minutes”.
- Do not say
“Remind me in 48 minutes”or other forms: those will trigger reminders instead of alarms – which require you to unlock the phone to be seen.
Done.
Open apps on the go
Sometimes your hands are cold, in gloves, or greasy. You can still open apps with Siri:
- Activate Siri by either long-pressing the Side Button, or saying “Hey Siri” (if enabled).
- Say “Open google maps”.
Convert measures
Sometimes you want to convert measures, like foot → centimeters, yards → meters, celsius → fahrenheit etc.
This is especially useful for non-metric countries like the US, or confused countries like the UK:
- Activate Siri by either long-pressing the Side Button, or saying “Hey Siri” (if enabled).
- Say “How many centimeters is 5 foot 4?”
Other examples:
- “How many Euros is 120 Swiss francs?”
- “What is 22% of 350 ?”
Look up basic information
- Activate Siri by either long-pressing the Side Button, or saying “Hey Siri” (if enabled).
- Say “What is the population of Switzerland?”
Other examples:
- “What is the temperature outside?”
- “Will it rain today?”
- “How many calories does ice cream have?”
- “What is this song?” – then let Siri listen to the ambient song for a bit
📞 Call and text for free
When calling people the iPhone defaults to the traditional cellular network. This sucks because there’s a native alternative with lower cost and higher quality – but using it requires some dexterity.
The same applies to SMS messages. In this case the better alternative is automatically selected, but you still need to beware of it as it backfires in some circumstances.
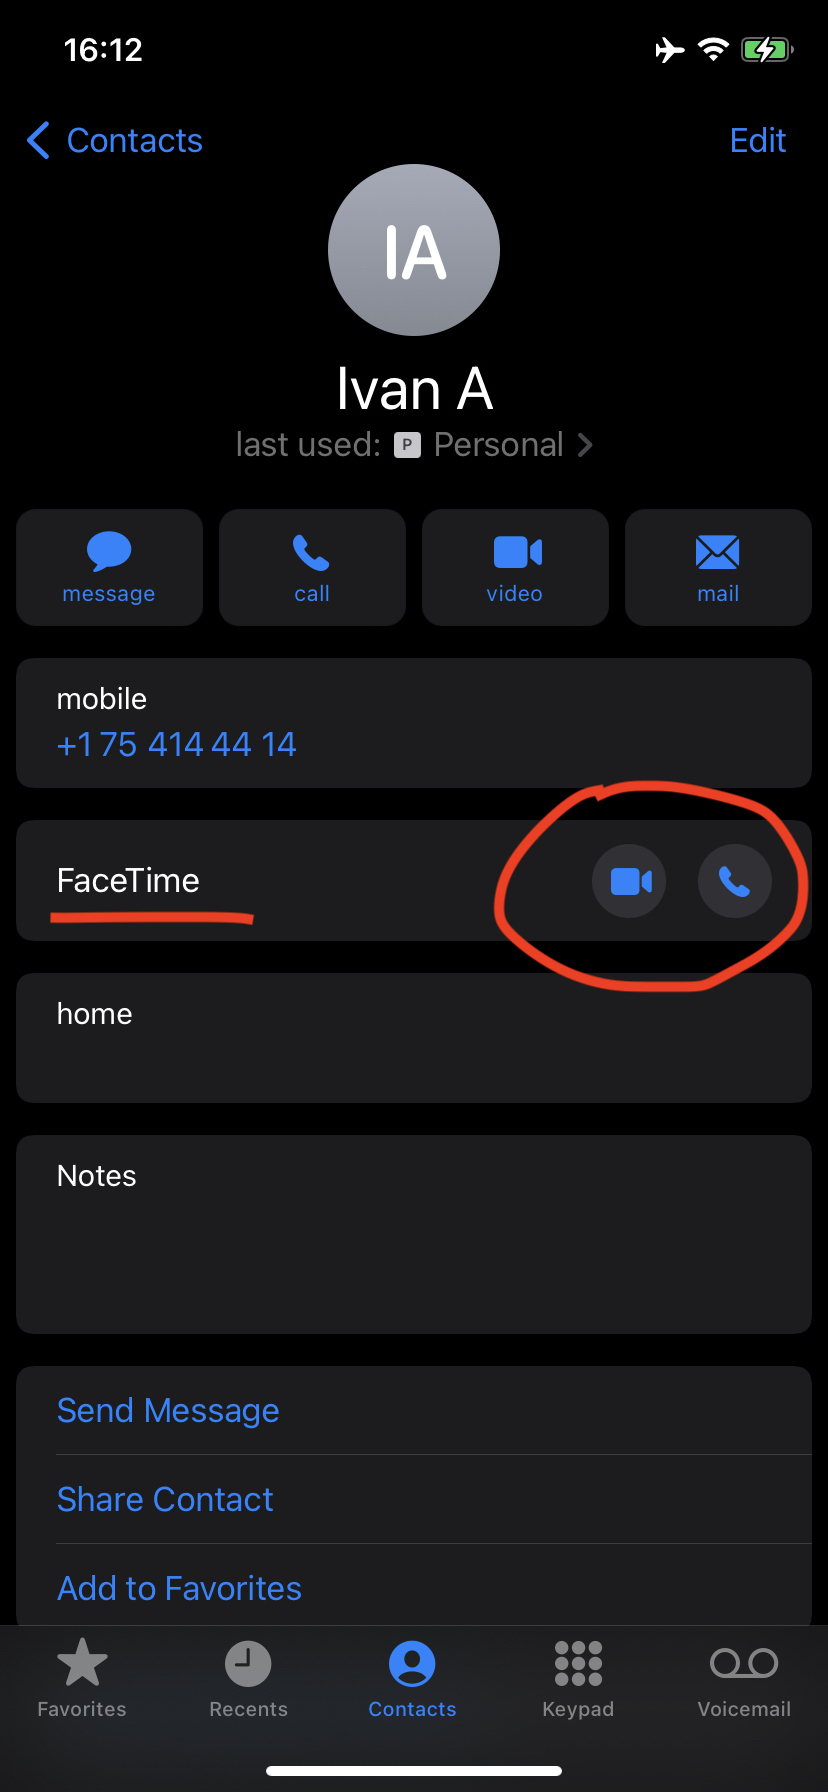
Call for free
With “FaceTime” you call through the Internet instead of your phone operator, giving you audio and video calls for free – even if they are in a different country:
- Open the “Phone” app (see quick app start).
- Tap a contact to call.
- If this person has an iPhone, a “FaceTime” box shows up. FaceTime only works between iPhones.
- From the “FaceTime” box, tap the camera to start a video call, and the handset to to start an audio call.
- If you need to re-call the person later, your “Recents” screen will automatically remember the type of call you made (over FaceTime).
FaceTime calls have many benefits beyond saving money:
- Much better sound quality, which is more pleasant and reduces the effort of understanding the other person, especially in noise or non-native language.
- It saves battery because it uses a more efficient encoding; especially if you’re on Wi-Fi.
Text for free
With “iMessage” you can text other iPhone users for free, working around your operator and their bills – even if the recipient is in a different country:
- Open the “Messages” app (see quick app start).
- Select a person to text.
- Look at the text box for write your message: if it says “iMessage”, your message will be sent for free. If it says “Text Message”, it will go through your network operator and be paid.
iMessage sends text, photos, videos and voice messages – all for free, even to iPhones in other countries. Beware of the following, though:
- If either you or the recipient have data disabled (e.g. you work in a building without WiFi and poor cellular), the message is not delivered.
- The same recipient might have iMessage at one point, and not at another. For example if they’re currently travelling abroad without a data connection, or if they changed their smartphone to non-iPhone.
🆘 Getting help
When you write me for help, use these tricks to help me understand the specific problem.
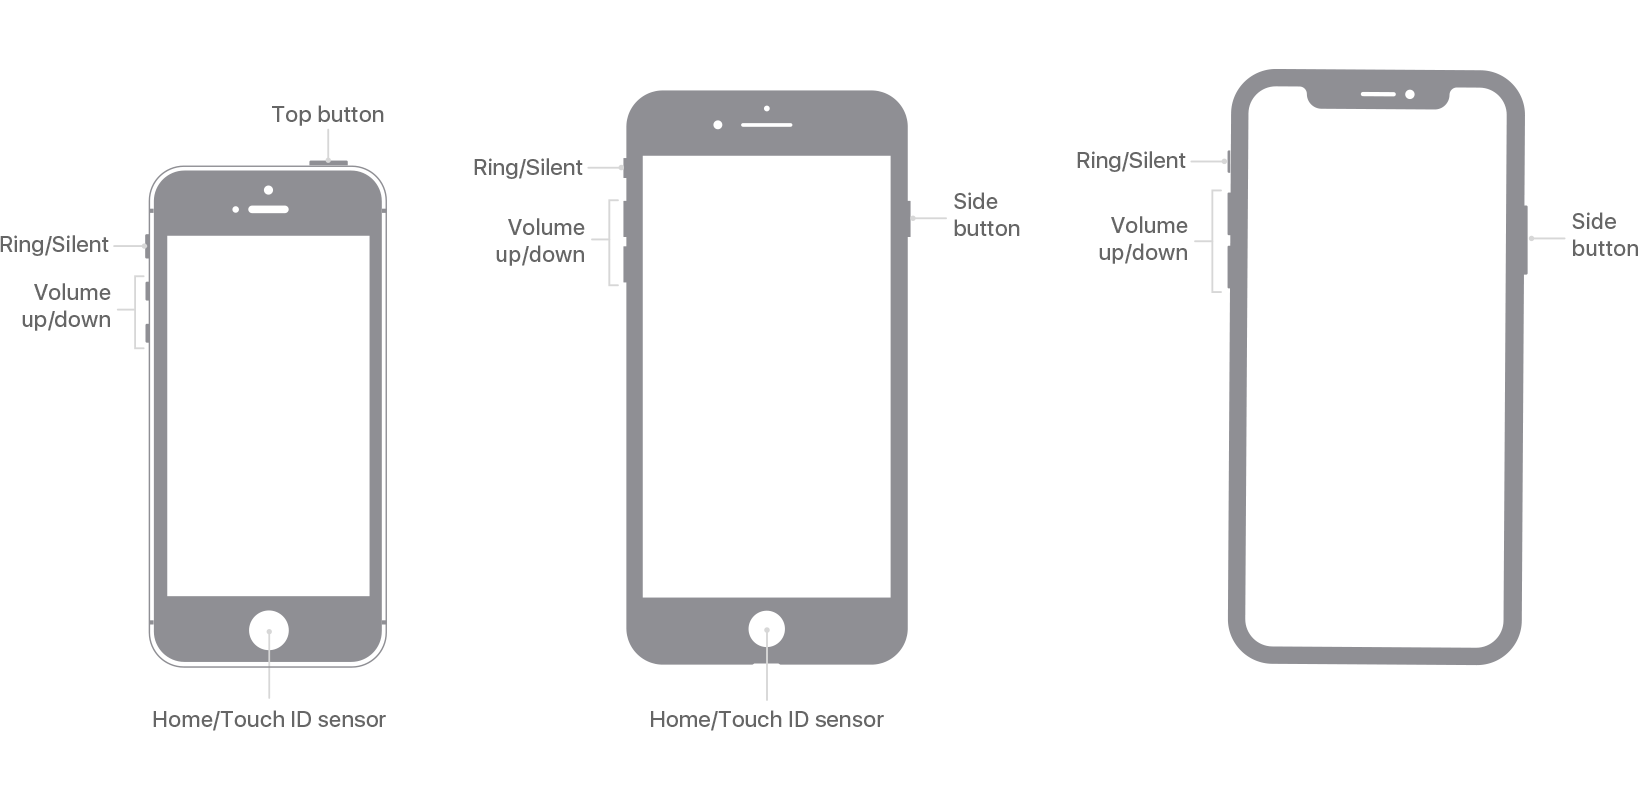
Screenshots
Take a screenshot – a picture of your screen, by pressing:
Side Button+Volume Upif you have FaceID.Side Button+Home Buttonif you have no FaceID.
Then:
- The screenshot shows up in the bottom-left corner of your screen. Tap it open.
- Press the “share” button (box with the arrow up) on the top-right of the screen to send it to me.
- Select how to send it to me. E.g. tap “Messages” and then my name in “To:”.
Screen recording
Sometimes your problem is actually a sequence of screens, or even a behavior that you want but is not happening. Send me a Screen Recording – a video of your screen – to show that.
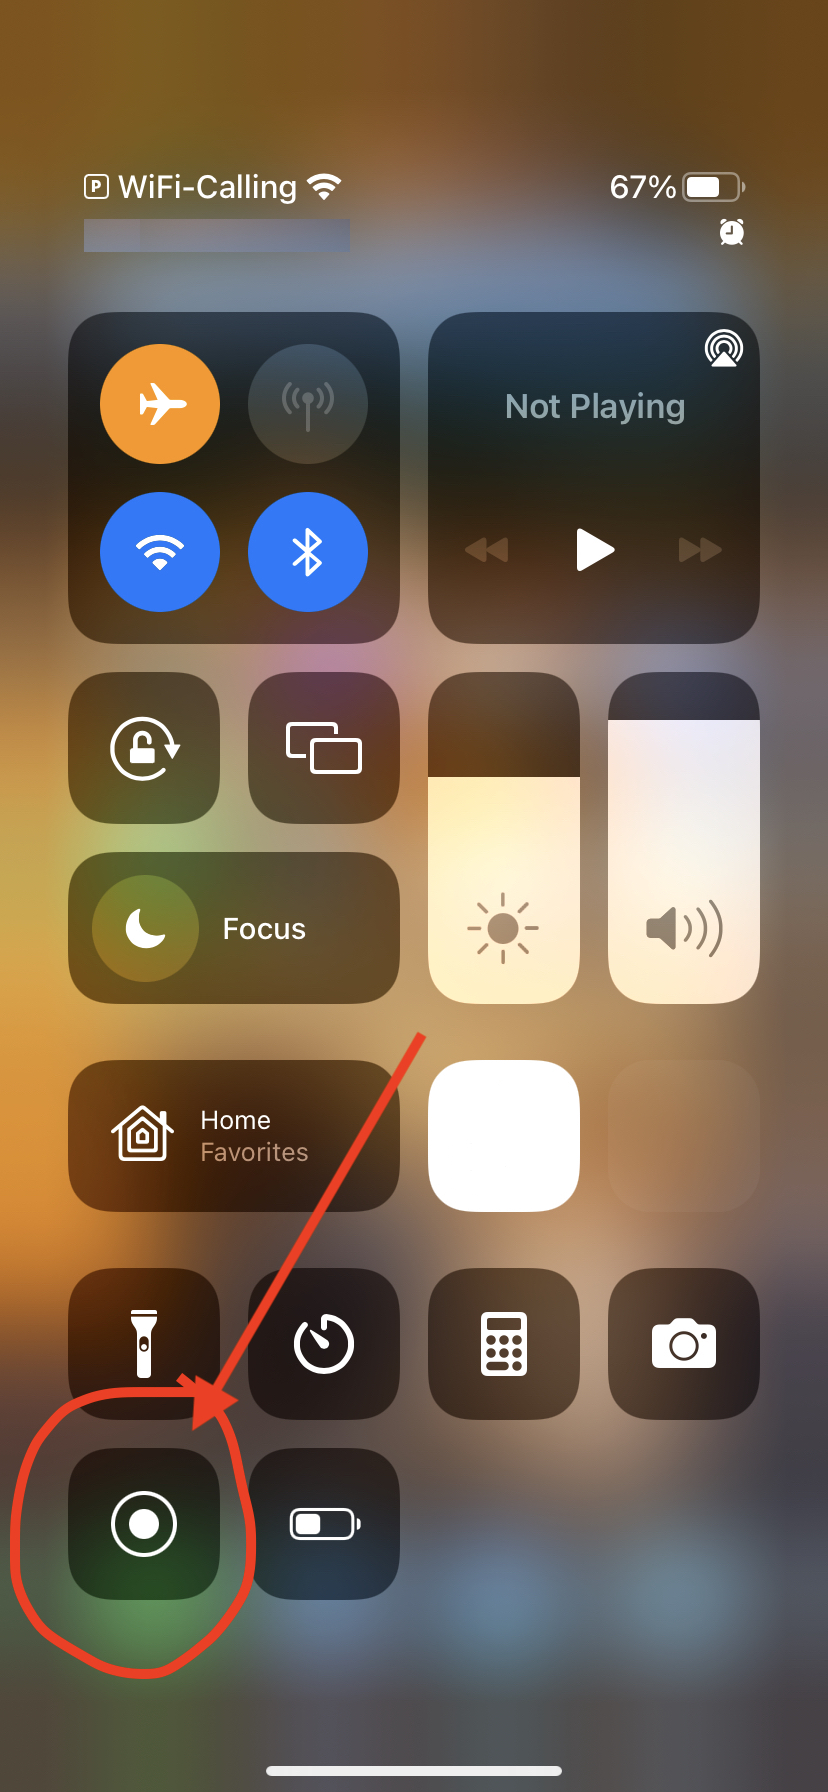
Setup (once only) a button for screencasts in your Control Center, once:
- Open the “Settings” app (see quick app start).
- Reach menu “Control Center”.
- Scroll to find row “Screen Recording” and turn it on.
Now, whenever you have an issue to show me:
- Swipe down the Control Center and tap the “Screen Recording” button.
- The recording will start in 3, 2, 1s … and the red button for “Recording” shows up top-right of your screen.
- Repeat the actions that give you the problem so everything is recorded.
- When you’re done, press the red “Recording” button to stop recording.
- The record is saved in your Photos. Go there, find it and share it with me.
📺 A good home screen
The home screen I recommend has only 2 components:
- A large picture widget to show you photos from your life so far.
- A recommended apps widget to offer you apps relevant to where you are or what you’re doing.
Picture widget in home screen
Dedicate a piece of your Home screen to recall pictures you took:
- Long-press on a “free” (background) area of your Home screen: all icons will start to jiggle.
- Press the “+” button on top-left of the screen, and you’re presented with a list of available widgets.
- Scroll down to find “Photos” and tap it open; you’re now offered a number of formats for a possible Photos widget.
- Scroll left to select a format that suits you. I recommend the “slim and wide” format.
- Press “Add widget” to add it to your home.
- Want to move it to a different position? Long-tap it and then drag it to the place you want.
- Press “Done” on the top-right of the screen.
Recommended apps in home screen
Use a piece of your Home screen to list apps you’re likely to use next:
- Long-press on a “free” (background) area of your Home screen: all icons will start to jiggle.
- Press the “+” button on top-left of the screen, and you’re presented with a list of available widgets.
- Scroll down to find “Siri suggestions” and tap it open.
- You’re offered various formats. I recommend the default “App Suggestions”, a low and wide widget with 8 app icons.
- Press “Add widget” to add it to your home. Then press “Done” on the top-right of the screen.
Siri recommends you apps based on:
- Where you are, what you do (e.g. are you in call?).
- What your routines are (e.g. listening to a podcast after waking up?).
- What’s about to happen (e.g. upcoming events, tickets soon to be due etc).
Get rid of apps screens
The App Library takes a couple of weeks to get used to, but then lets you manage apps better and faster than your DIY app screens.
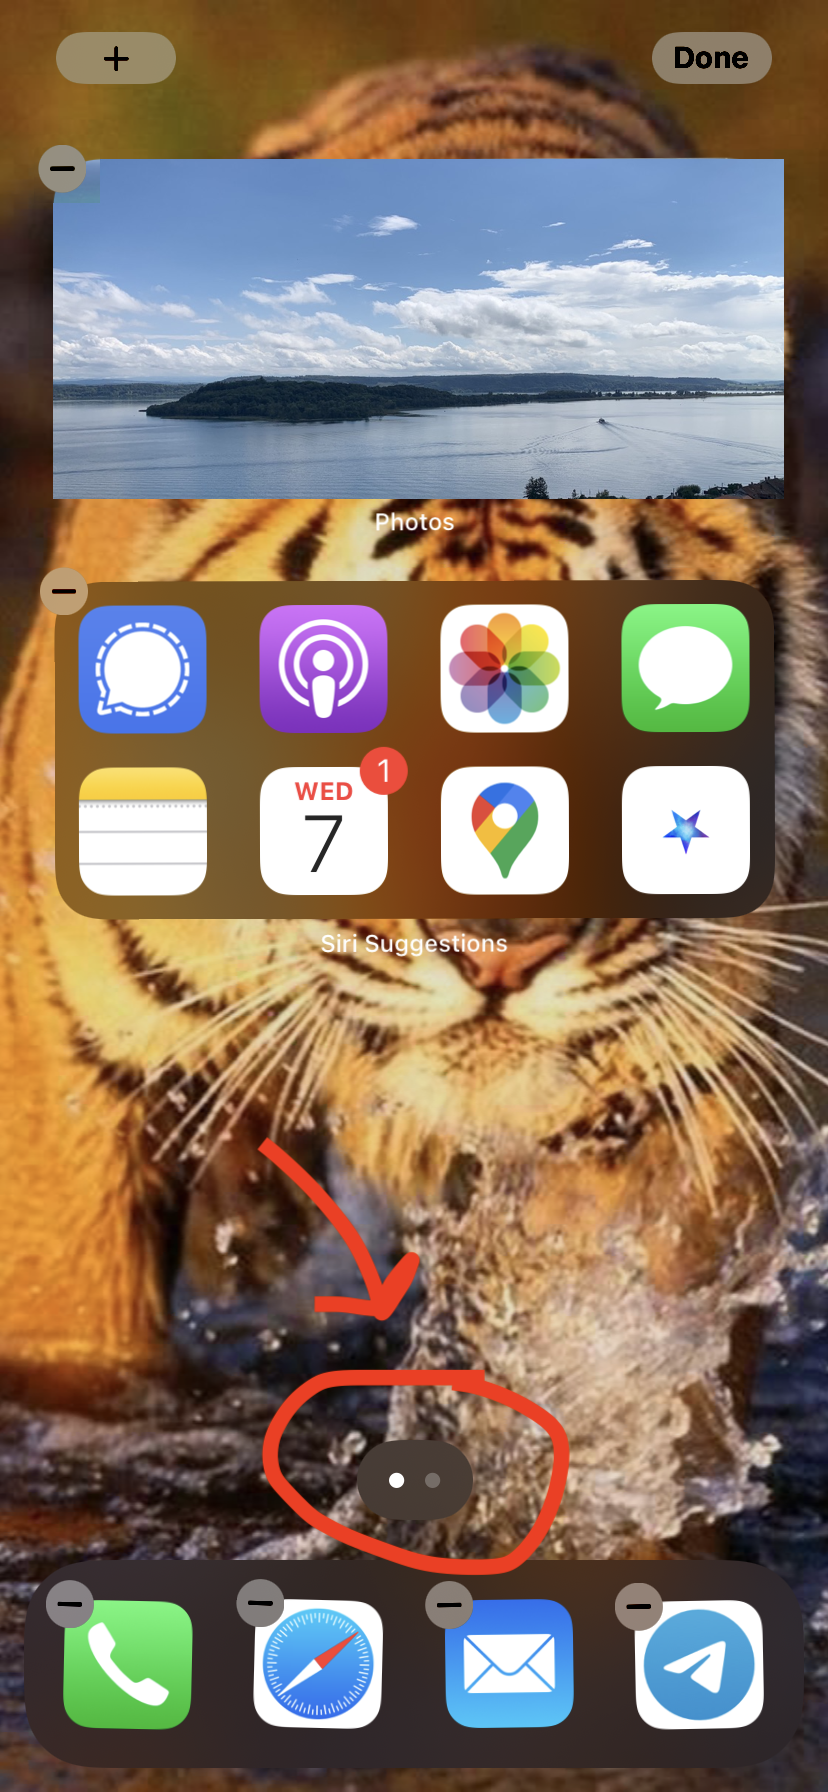
When you’re ready, get rid of them:
- In the Home Screen, long-tap on the background; icons start to jiggle.
- Press on the “row of dots” in the bottom-center of the screen; it’ll show you all app screens.
- Tap the “-” (minus) sign on every screen, and you’ll be left with the home screen only. The App Library is always available “after” the last screen.
🔐 Security
Did you know that passwords are today’s biggest security problem online?
- Over half of all security incidents are caused by stolen passwords.
- Weak and re-used passwords are the main source of credential breaches.
- In many cases, credentials are leaked because a website is hacked and your username and password are shared online.
- There are online services dedicated to collect all credentials leaked, to assist the victims at finding out and updating their password.
Your iPhone comes with Keychain, a system which solves both problems:
- It creates strong passwords for you. That’s passwords which resist months of brute-force attempts before breaking. (Many common passwords only take hours to break).
- It records those passwords securely to pre-fill them when you visit the respective service.
- It stores your passwords securely in the Cloud so your other devices can reuse them. Securely means encrypted end-to-end, i.e. nobody can see them, not even Apple.
Accept strong passwords
To use Keychain, use Safari whenever you create an account on some website. That’s your default case unless you installed other browsers:
- Whenever you create a new account on a website, tap on the “Password” field, Safari offers you to use a “Strong password”.
- Always accept that! Never type in your own password, which is surely much easier for attackers to find, and probably even shared with other sites.
- Complete account creation, and Safari automatically saves the password securely in your Keychain.
Whenever you try to log into this website again, the iPhone will automatically pre-fill the same password – so you never need to remember it.
This works both when browsing the web, and (nearly always) in apps too.
Recall strong passwords
There’s no way for you to remember a strong password. But it’s also not necessary – Keychain remembers them for you.
If you need to manually enter the password on another computer, here’s how you can read it out of your Keychain:
- Open the “Settings” app (see quick app start).
- Scroll down to find “Passwords” and tap it open.
- After verifying your identity (FaceID, TouchID or unlock code), you’re shown all credentials you have.
- In the “Search” field on top, type the service you want. E.g. “google”.
- Tap the account you are looking for, then tap “Password” to have your password shown.
Shoulder surfing
Your iPhone unlocking code protects a lot of sensitive information:
- Your iPhone.
- Your passwords.
- Your payment data.
- Your private pictures.
- Your iCloud account.
… yet you type your unlocking code several times when you’re out. It won’t be long before a camera records you typing your code … and you lost your security.
This is called “shoulder surfing”, i.e. simply observing – visually or via cameras – what you type on your iPhone screen.
How to defend against this?
This is inconvenient, but necessary. To be more secure, enable FaceID for authentication whenever possible, so you’re required to type your unlock code less often. FaceID cannot be fooled by pictures of your face, so it’s actually more secure.
Avoid spam with Hide my email
Here’s a common issue: you create an account with a website and give them your email. Then they get hacked, and all emails of their users get leaked online – ready for spammers to use.
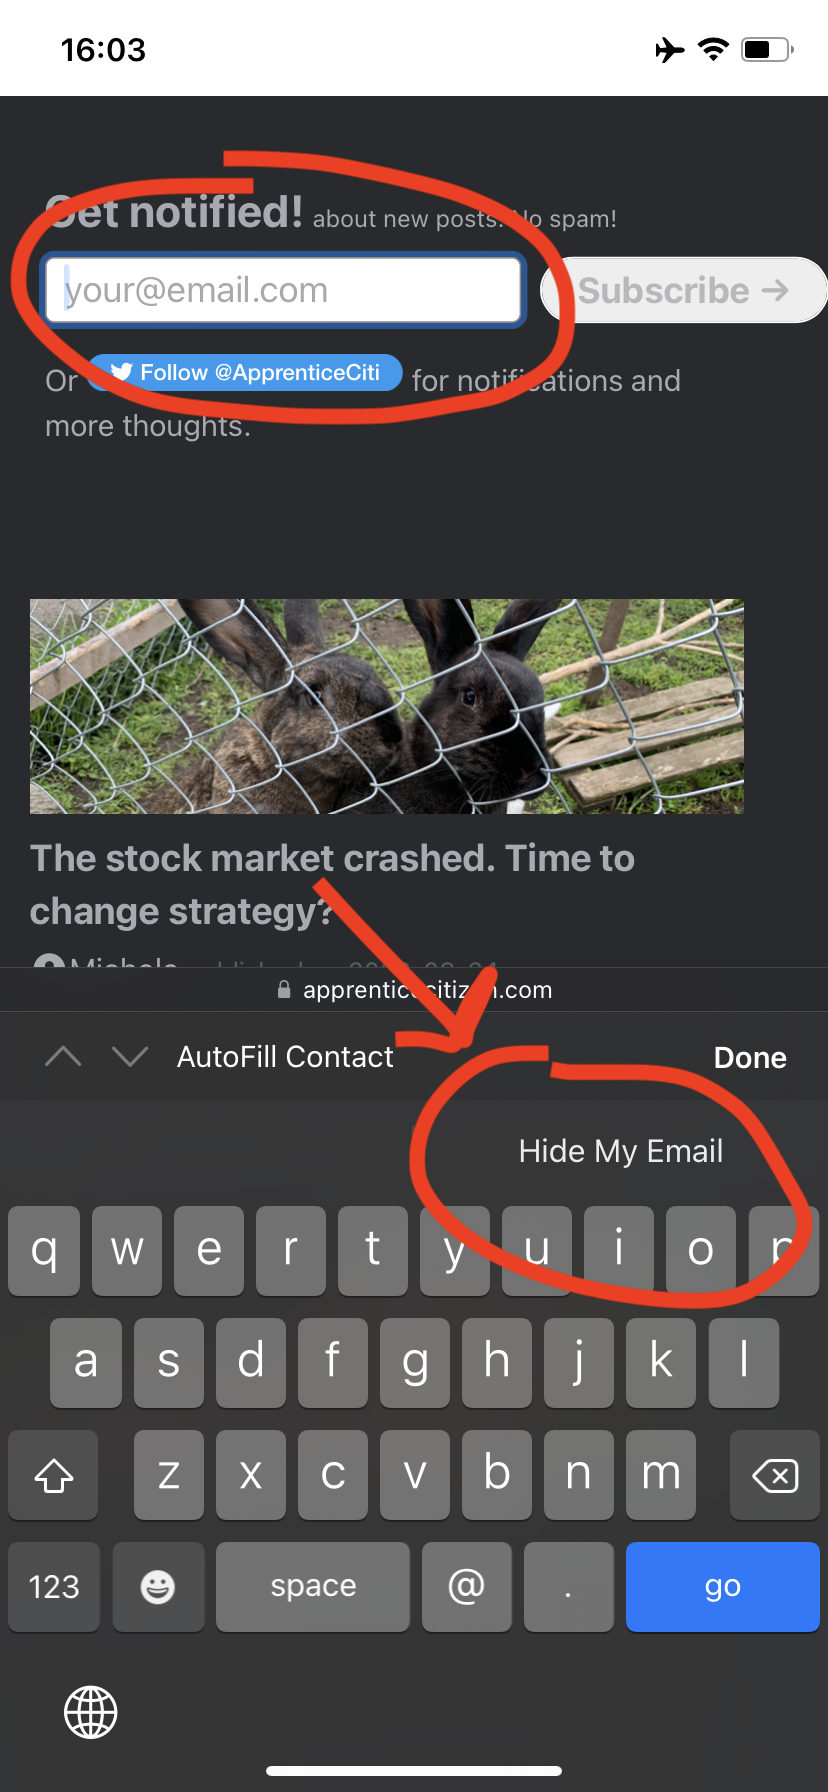
Hide my email is a service by Apple to protect from this case, and to hide the identity associated with your email. Use it as follows:
- Select a field for email anywhere on a website.
- Your iPhone suggests you your email addresses, and also “Hide my email”.
- Tap “Hide my email”.
- A screen will show up to show you the “disposable address” generated for you. If you have multiple email addresses, this also allows you to select which one will receive emails sent to the disposable address.
- Press “continue” and your address will be filled in the form.
Feel free to use “Hide my email” as often as you want – free unlimited addresses.
🇨🇭 Swiss-specific
Here’s a collection of iPhone apps crucially useful in Switzerland 🇨🇭:
- VoteInfo – find all information for our periodic voting, along with all results – an official app by the Swiss Confederation.
- SBB – Check public transport routes, buy discount tickets ahead of time, show your “half-fare card” without having it physically with you, or simply tap “EasyRide” on and off to ride without making a ticket.
- SwitzerlandMobility – Trails for strolls, hiking, biking, skating and even canooing, prepared and maintained with support of the Swiss Confederation.
- The app of your health insurance – to show your health insurance card without having it physically with you. See e.g. CSS, Groupe Mutuel, Helsana, Sanitas and SWICA.
Conclusion
Has any tip been a game changer for you? Or did I miss any important one? If so, let me know in the comments.
If you found the list useful, share it with some friends. Link a specific tip by copying it from the Table of contents.
Finally, subscribe to my newsletter to receive future posts monthly. Or follow me on Twitter for occasional thoughs.